Help

Re: Help with script...

817 0
cancel
Showing results for 
Search instead for 
Did you mean: 
Angie_Hanna
5 - Automation Enthusiast

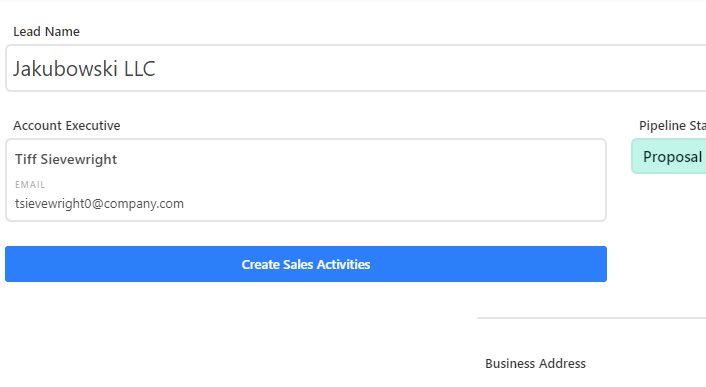
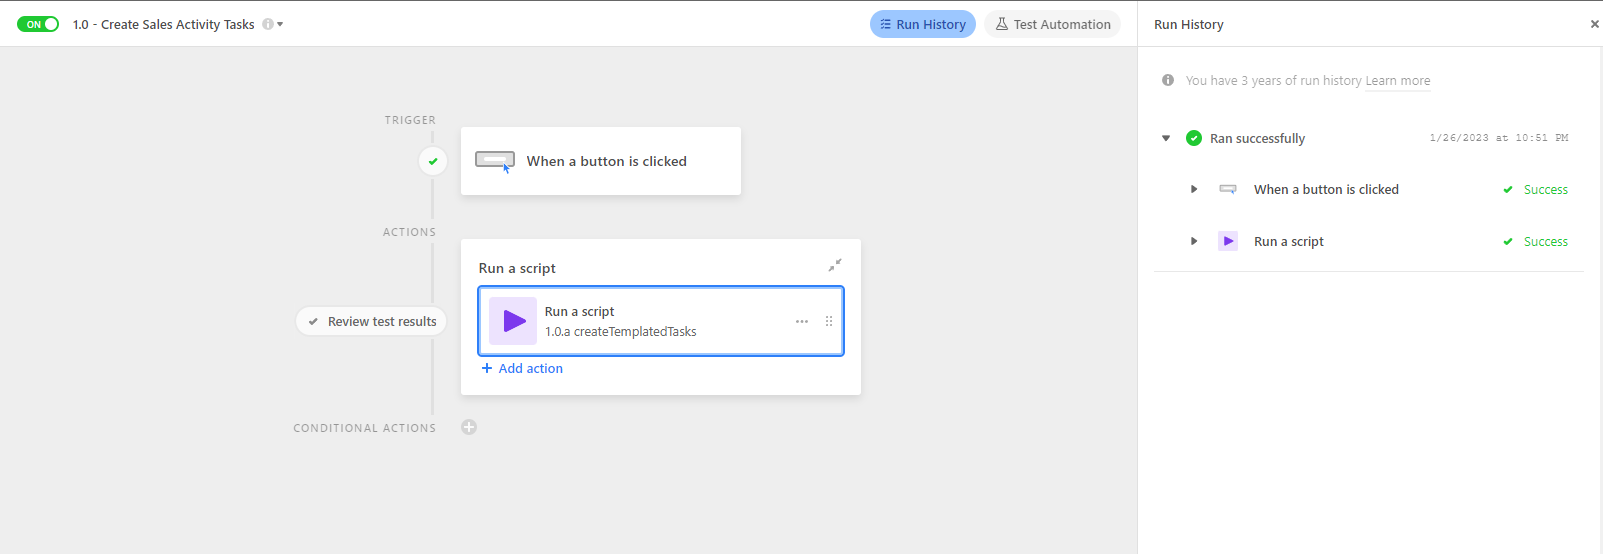
I had a script configured to generate a task list  on a button trigger based on the one in the Airtable Marketplace that had the settings input. I have moved everyone out of the base and into Interfaces, so the button won't work.

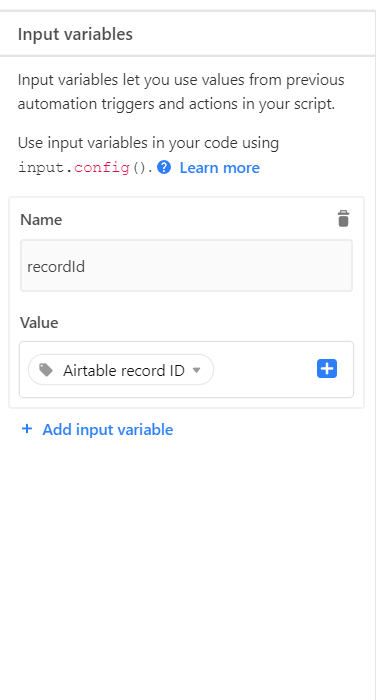
I tried to write a new script (and I know nothing about writing code) to run on a status change trigger automation. It runs with no errors, and recognizes the input.config from the input variables I set up in the automation but doesn't actually create the new records. I had a developer friend look at it, but he's not familiar with Airtable, and the suggestions he did make were way over my head. Anyone see where the error is?


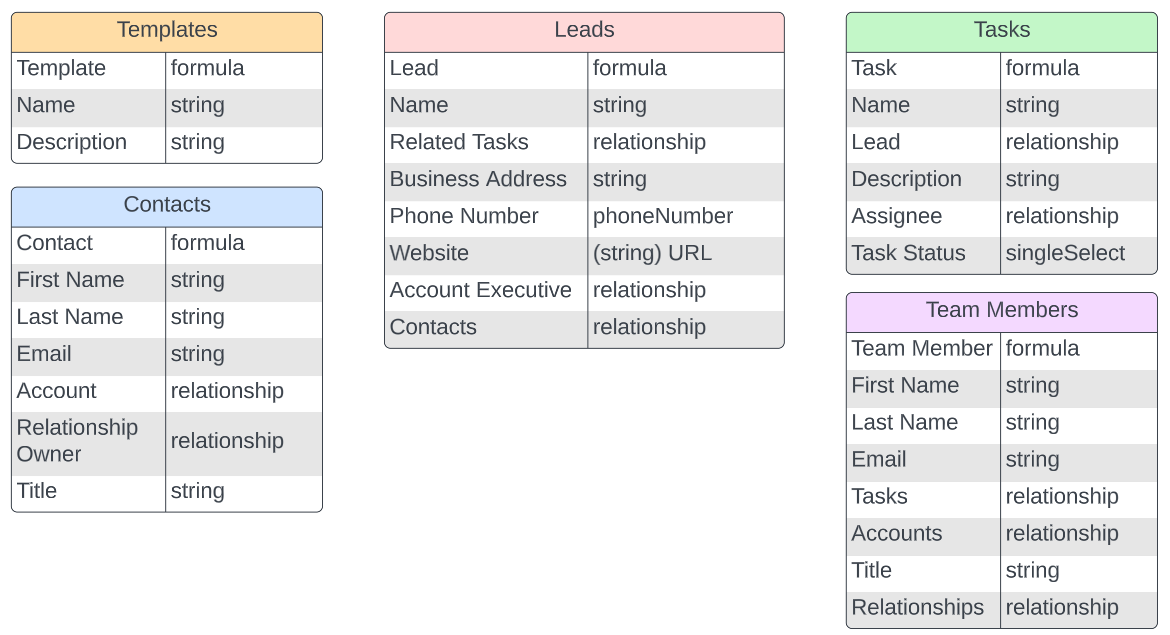
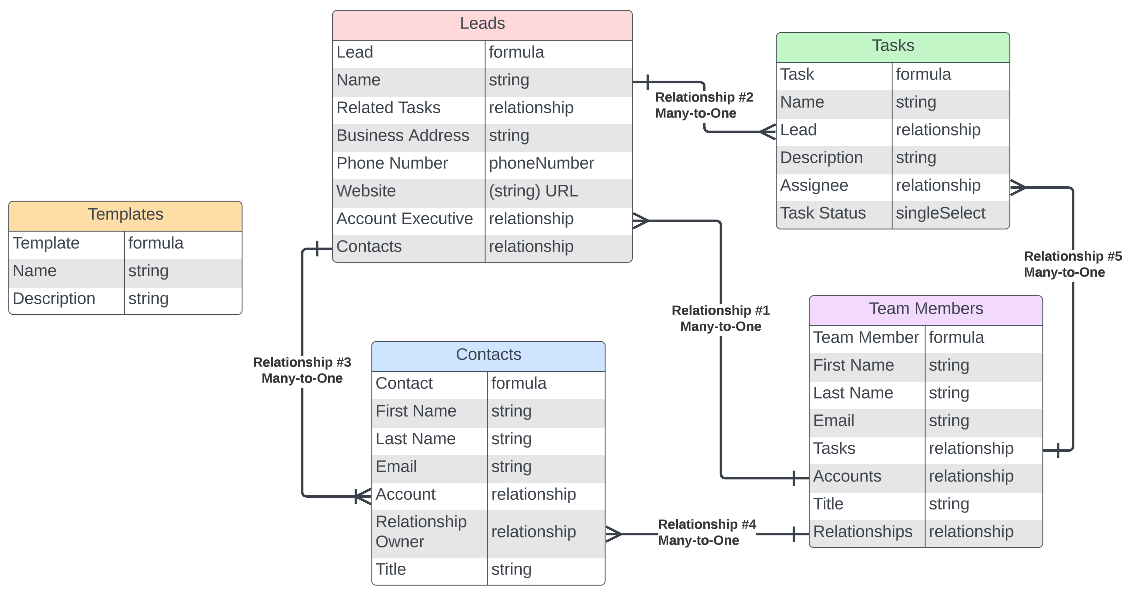
let parentTable = base.getTable("Pipeline");
let typeTable = base.getTable ("Checklists");
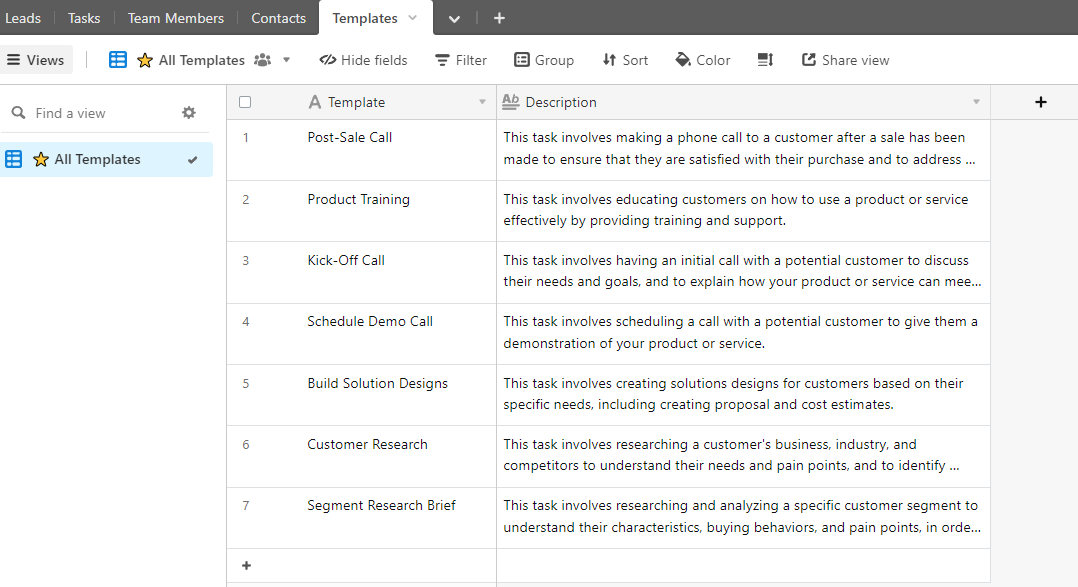
let templateTable = base.getTable ('Template Tasks');
let childTable = base.getTable ('Tasks');
let templateType = templateTable.getField ('Checklist');
let childFieldInTemplate = templateTable.getField ('Task');
let templateOrder = templateTable.getField ('Task Order');
let childOrder = childTable.getField ('Task Order');
let childNameInChild = childTable.getField ('Task');
let parentFieldInChild = childTable.getField ("Lead Name");
let selectedEvent = input.config();
let parentType = selectedEvent.parentType;
let typesQuery = await templateTable.selectRecordsAsync();
let typesRecords = typesQuery.records;

let types = typesRecords.map(c => ({
'child': [c],
'childName': c.getCellValue(childFieldInTemplate),
'templateType': c.getCellValue(templateType).map(x => x.id),
'templateOrder': c.getCellValue(templateOrder),
'Assigned': c.getCellValueAsString('Assigned')
// Add additional template fields here and in section below using format below.
// Field names within c.getCellValue parentheticals should match field names in template table
// 'templatePhase':c.getCellValue('Phase'),
// 'templateDays': c.getCellValue('Days')
})).filter(x => x.templateType.includes(parentType[0].id))

// Create the child records and sort them so that they are in order
let createRecords = types.map(c => ({
fields: {
[childNameInChild.name]: c.childName,
[parentFieldInChild.name]: [selectedEvent],
[childOrder.name]: c.templateOrder,
['Assigned']: {name: c.Assigned}
// Add additional template fields here and in section above using format below.
// Field names on the left should match field names in child table.
// Field names on the right following c. should match names created in section above that starts at line 72.
// 'Phase':c.templatePhase,
// 'Days': c.templateDays
}
})).sort((a, b) => {
return a.fields[childOrder] - b.fields[childOrder];
});

if (selectedEvent) {
// create records in batches of 50
while (createRecords.length > 0) {
await childTable.createRecordsAsync(createRecords.slice(0, 50));
createRecords = createRecords.slice(50);
}
};
4 Replies 4

Although your script is a little too much for my spare 5 minutes, I can advise that through my experience of using a Button Element within an interface, is that it usually works best (well, at least in my scenarios and testing) when you tie the button action to update a field in the active record - in my case, all of my tables have an "Automation" Single Select field, with sometimes a dozen or more automations. This allows me to trigger an automation against a record from either within my Base, or, via the Interface Button that's tied to that field.

I simply encountered too much bottle-neck and duplication when attempting to write an Automation that's directly tied to an Interface Button element - as often that same workflow needs to be triggered in multiple places, be it different interfaces, or the base itself.

To get started with solving your problem, create a test base, with a table, that contains an "Automation" single select field, and create a couple of testing options in that field that can then trigger an automation. Then, from your interface for that base, create a button tied to that Automation single select field.

Let us know how you go!

Ben_Young1
11 - Venus
11 - Venus

Hey @Angie_Hanna

Truthfully, while I understand what the script is doing, it's hard for me to really think about a solution to your problem without a more clear picture of the entire base and schema that you're working with.

I'm feeling a bit ambitious today, so I'm going to walk you through a start-to-finish of how I would implement an Interface-based button to create templated tasks in an ops-oriented use-case.

If you'd like to look at the base I created and referenced in this post, here's a shared base view for you. Feel free to duplicate the base into your workspace and play around with it yourself.
I'll leave it public indefinitely.

Base Structure

First, I started with a brand new base and referenced the table names you had in the script you posted to get a sense of what you're working with. That being said, I made a few symantic changes so that we fit a bit more along the lines of best practices when thinking about databases.

Ben_Young1_0-1674761741436.png


You want each table to hold information about a specific type of thing.
Consider the following:

  • Leads --> Lead
  • Tasks --> Task
  • Team Members --> Team Member
  • Contacts --> Contact
  • Templates --> Template

Each record within each respective table should breakdown cleanly into one of those record types.
This will also make it easier to determine what types of information we want to store about each record in our respective tables.

From here, I will go ahead and create some fields on each table that will store the respective data about our unique data points.

Here's a diagram that breaks down our starting fields:

Ben_Young1_2-1674762630503.png

You'll notice that there are a good number of relationship (linked record) fields on each respective object, with the exception being the Templates object (table). We'll touch on this particular object later.

We need to define how each object relates to one another. Here's the ERD (Entity Relationship Diagram) that breaks down each relationship.

Ben_Young1_4-1674763589205.png

Here's the breakdown of the relationships:

  • Relationship #1: Each lead has one Account Executive (AE), but each AE may be related to multiple leads at a given time.
  • Relationship #2: Each lead can be related to multiple tasks at once, but each task is only related to a single, unique lead.
  • Relationship #3: Each lead can be related to multiple contacts, but each contact can only be related to a single lead. This is generally just the company they work for.
  • Relationship #4: Each contact has a primary point-of-contact on your (theoretical) team that owns the relationship. Team Members might own multiple relationships with contacts.
  • Relationship #5: Each task is assigned to a single team member, but each team member may have multiple assigned tasks at a given time.

I've intentionally committed to having the Templates object remain isolated and not share any relationships with the other objects.
There's not a right or wrong way to implement the Templates object here, and I'll dig into the different permutations once we talk about the script implementation.

I've gone ahead and programmatically generated a bunch of test data to populate our base.
None of the contact data here is real, so no worries about any PII.
Here's a peek at what things are starting to look like:

Ben_Young1_5-1674765883037.png

Ben_Young1_6-1674765976174.png

Ben_Young1_7-1674766006157.png

Ben_Young1_8-1674766021146.png

Interface & Automation

Now that we have our structure, I'm going to breeze along through the Interface portion since you've already got something with the final intended button that will trigger your automation.

This now leaves us at the automation and script portion.
For this script, I'm going to set up a single input variable which will provide us the record ID of the trigger record from the Interface button.

It should look like this:

Ben_Young1_1-1674791002240.png

Before we continue, this is an important place for me to note that I'm not a developer. I just happen to know how to kinda hold my weight in JS. I don't expect you to fully understand every part of how this script is explained, but I figured that it might prove valuable to you or someone else in the future to be able to read through the thought process and perhaps use it as a stepping stone into becoming more comfortable with scripting.

This is all to say that I'm going to try and make everything here as accessible as possible, but it's not super important that you understand all the granular details that go towards making everything work.

From here, we'll hop into the actual editor.
The first thing we need to do is access the record ID that we provided ourselves via the input variables.
Input variables are stored on the input object and can be accessed by calling the input.config() method on the object. 

To do this, we'll assign the input object to a variable, and then deconstruct the stored values to separate variables. Since we're only dealing with a single value from the object, it's fairly straight forward.

Here's what it looks like:


const config = input.config();
const { recordId } = config;


Next, we're going to take care of our tables.
In this case, we're dealing with the "Leads" and "Tasks" tables.
We can use the base.getTable() method to retrieve the relevant tables that we're working with.


const config = input.config();
const { recordId } = config;

const leadTableId = "tblddi9E1WxoLvM3i";
const taskTableId = "tblQGe5knx5rANb63";
const templateTableId = "tblLANDBLUZyHV6Lt";

const leadTable = base.getTable(leadTableId);
const taskTable = base.getTable(taskTableId);
const templateTable = base.getTable(templateTableId);


You'll notice that I opted to use the table ID instead of the table name.
There's a few reasons why it's a best practice to use the ID instead of the actual base name as shown in the code snippet below:


const config = input.config();
const { recordId } = config;

const leadTable = base.getTable("Leads");
const taskTable = base.getTable("Tasks");
const templateTable = base.getTable("Templates");


The biggest reason to err on the side of using the ID is that if there is a point in the future where you (or someone on your team) might end up changing the name of a table (or field), it would lead to your script no longer being able to find the table you're looking for.
Unlike the behavior of formulas, when you change the name of an object within a base, the name does not automatically update to reflect the changed value.
That might not seem like a big problem if you're only dealing with a single script, but once you put a few months behind you, it is extremely easy to forget about each place where you have hard coded each name.

Now that we have our tables, we can plot out what we need to do.

  1. Get the data from each template record in the Templates table.
  2. For each record we find in the Templates table...
    1. Create a new task record in the Tasks table using the template data.
    2. Link each new task record to the Lead record (the record that triggered the automation.)
    3. Link each new task record to the Lead's Account Executive.

For the sake of moving along, the final script is below.
If you actually want a walkthrough on what's happening here, feel free to let me know and I'll post a more detailed look at what's happening.
That being said, I've done my best to make things as readable as possible if you'd like to just pop open the Airtable API docs and MDN and power through trying to piece together what the script does.


const config = input.config();
const { recordId } = config;

const leadTableId = "tblddi9E1WxoLvM3i";
const taskTableId = "tblQGe5knx5rANb63";
const templateTableId = "tblLANDBLUZyHV6Lt";

const leadTable = base.getTable(leadTableId);
const taskTable = base.getTable(taskTableId);
const templateTable = base.getTable(templateTableId);

//Returns the Acct. Exec. linked record ID if defined, otherwise returns undefined.
const accountExecutiveRecordId = await leadTable.selectRecordAsync(recordId)
.then(record => {return record.getCellValue("fldVDCrbBhESrPZVd")[0].id});

//Returns all template record objects from the Template table.
const templateRecords = await templateTable.selectRecordsAsync()
.then(records => {
    return records.records;
});

//Array of new record objects that will be used to create the final task records.
let newTaskRecords = templateRecords.map(templateRecord => ({
    fields: {
        //Name
        "fldjcp7Cg4gM0xKxN": templateRecord.getCellValue("fldWqhRqOECZJUT0Q"),
        //Description
        "fldhRQDd0BLTLHN9W": templateRecord.getCellValue("fldWnTa2IMsG106Wl"),
        //Task Status
        "fldMyE4wvEEqt3ens": {name: "To Do"},
        //Assignee
        //If the Lead is not linked to an AE, then the script will throw an error.
        "fldW3DzahxKKju7qr": [{id: accountExecutiveRecordId}],
        //Lead
        "fldKuxkauw7P7tGmr": [{id: recordId}]
    }
}));

if (newTaskRecords) {
    //If there are more than 50 records to create, batch the record creation.
    //Otherwise, complete a single table call.
    if (newTaskRecords.length > 50) {
        while (newTaskRecords.length > 50 || newTaskRecords.length > 0) {
            await taskTable.createRecordsAsync(newTaskRecords.slice(0, 50));
            newTaskRecords = newTaskRecords.slice(50);
        };
    } else {
        await taskTable.createRecordsAsync(newTaskRecords);
    };
};


To test our script, we'll pop over to the Interface, select a Lead record that we want to create our Tasks for, and click the button to start the automation.

Ben_Young1_2-1674795091808.png


Ben_Young1_3-1674795183948.png

Ben_Young1_4-1674795242607.png

Important Things To Keep In Mind

Firstly... It's commented into the script itself, but if there is not an Account Executive linked to your Lead, then the script will throw an error if you attempt to run the script. I made the decision to leave this behavior as is because adding in a logic layer to resolve whether or not there is an AE linked to the lead would've made the script a bit more confusing as is.
Additionally, I think that it's actually net beneficial to not be able to create new tasks in bulk without having an AE assigned to the related tasks, since it would prevent a bunch of unassigned, free-floating task records from appearing in the database.

This brings us to the second thing:
If you read the snippet of the script you pasted, you'll notice that I've omitted the portion of the array handling that resolves the sorting of the array of (record) objects that is passed to the final table call(s).
This is because I honestly just do not understand what it is intended to solve for. 

Lastly, in the original script, there is a field used to define the "order" of the tasks. At least, this is what I presume it is for.

I've remove these fields from my demo because I frown upon how the script incentivizes users to rely on what I presume is a single-select, string, or number field to define the "order" that the tasks should be completed in.
If you need to create dependencies between your templates (and for your tasks), you should be leveraging the design of the database by defining actual task dependencies with linked records.

I kinda worked on this throughout the day, so the pacing of my thoughts as I was typing them might have some variance, so please feel free to poke around and ask any follow up questions if you have any.
As mentioned at the start, there's a base shared view that you can use to copy the base and look at everything hands on if you're curious.


Edit: Fixed a small logic issue in the execution of the final script that wouldn't complete the final round of record creation once the array length was below a value of 50.

Angie_Hanna
5 - Automation Enthusiast

Thanks for the responses.

I wasn't trying to create an interface button, I just wanted to create an automation for "When a record is updated... run a script" so thatany time the "Status" field changes, the task list for that status is generated. However, I will read through this and see if I can get it to work.

Sweet!
In the context of my post, you can simply change the automation trigger to fit your criteria, and everything else should remain the same.
There are a couple of smaller changes to the structure that would need to be considered, but consider the original post as a blueprint for you to push off from.

If you'd like an updated walkthrough with the tweaks applied, I'd be happy to hop in and post it!