You would need to automate that process in a different way.
I would suggest creating a new field — a NORMAL date field — to hold the date & time you’re looking for.
Then, you can use Integromat to watch your records for you.
Whenever a record gets changed to the field value that you’re looking for, Integromat can insert the current date/time into your new date field for you.
This could also be done with Airtable’s native automations if your base is part of a Pro- or Enterprise-plan workspace.
This could also be done with Airtable’s native automations if your base is part of a Pro- or Enterprise-plan workspace.
More details, please.
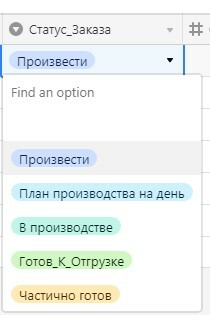
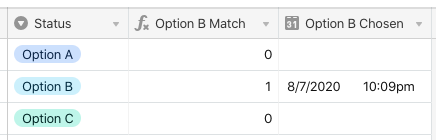
In this example, my {Status} field has three options, and I want to know when “Option B” is chosen.

I added a formula field that looked for that specific option:
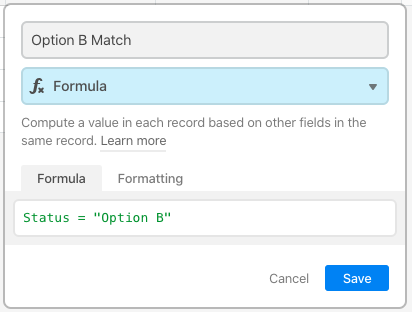
That will output a 1 when there’s a match, and a 0 the rest of the time. I then added a view with a filter to show records when that formula field contains a 1. I named this view “Trigger: Option B” as a reminder that this view triggers an automation.

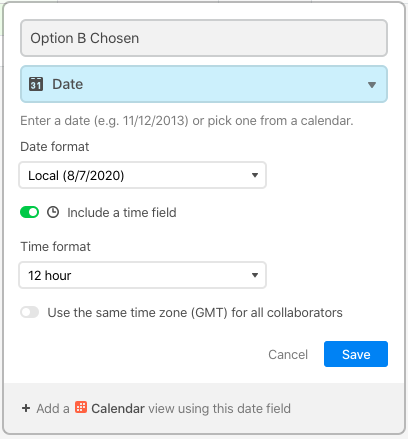
I added a date field named {Option B Chosen}, where the automation will store the date and time that “Option B” is selected.
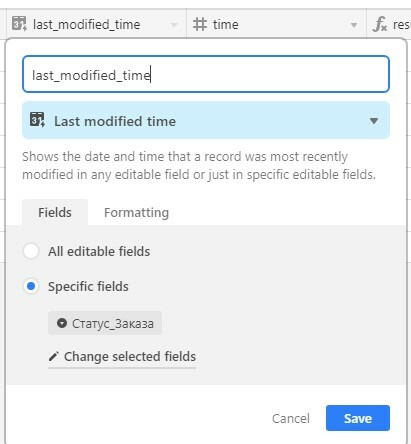
I also added a “Last Updated Time” field named {Status Updated}, which will capture any changes to the status.
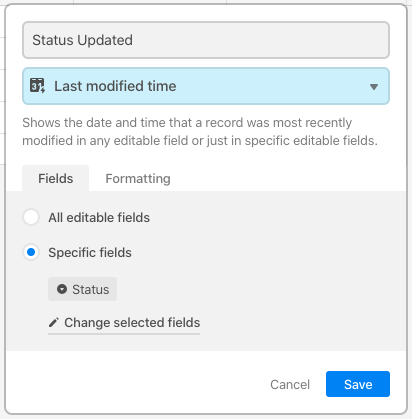
NOTE: Both {Option B Chosen} and {Status Updated} should be formatted with the time field ON, but not set to GMT. This will ensure that all recorded times remain local. (If you leave the time option off, things won’t work cleanly.)
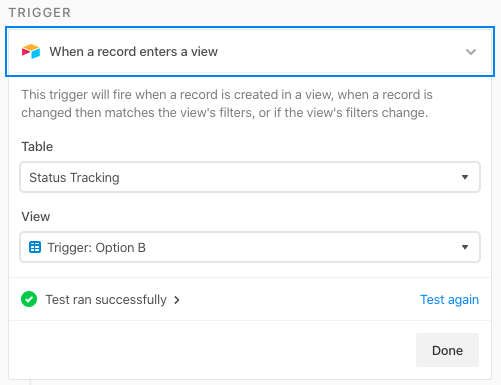
I added a new automation named “Status Change: B” to trigger when a record enters that view. Make sure that you have at least one record with that option chosen so that the trigger will test successfully.
I then added a “Update a record” action. This will copy the date and time from the {Status Updated} field into the {Option B Chosen} field.
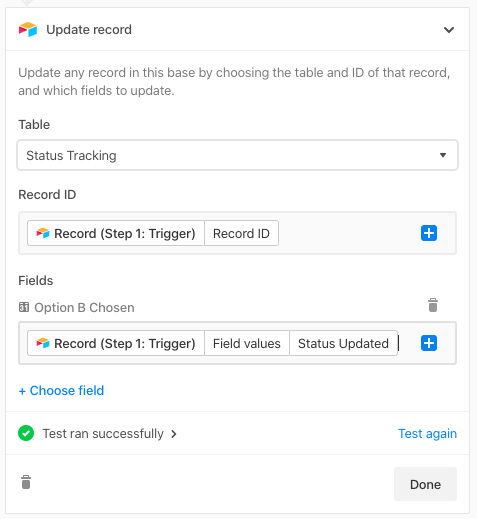
When the status changes to “Option B,” the date will be stored in {Option B Chosen}. For all other options, nothing will happen.
This setup works well when you only want to track a few options out of a larger list, because you’ll need a formula field, a date field, a view, and an automation for each option (you can use the same Last Modified Time field for all of them). When you want to do something unique with lots of options, I’d recommend a slightly different approach (which I won’t get into here in the interest of time, and also because it’s very use-case specific).
In this example, my {Status} field has three options, and I want to know when “Option B” is chosen.
I added a formula field that looked for that specific option:
That will output a 1 when there’s a match, and a 0 the rest of the time. I then added a view with a filter to show records when that formula field contains a 1. I named this view “Trigger: Option B” as a reminder that this view triggers an automation.
I added a date field named {Option B Chosen}, where the automation will store the date and time that “Option B” is selected.
I also added a “Last Updated Time” field named {Status Updated}, which will capture any changes to the status.
NOTE: Both {Option B Chosen} and {Status Updated} should be formatted with the time field ON, but not set to GMT. This will ensure that all recorded times remain local. (If you leave the time option off, things won’t work cleanly.)
I added a new automation named “Status Change: B” to trigger when a record enters that view. Make sure that you have at least one record with that option chosen so that the trigger will test successfully.
I then added a “Update a record” action. This will copy the date and time from the {Status Updated} field into the {Option B Chosen} field.
When the status changes to “Option B,” the date will be stored in {Option B Chosen}. For all other options, nothing will happen.
This setup works well when you only want to track a few options out of a larger list, because you’ll need a formula field, a date field, a view, and an automation for each option (you can use the same Last Modified Time field for all of them). When you want to do something unique with lots of options, I’d recommend a slightly different approach (which I won’t get into here in the interest of time, and also because it’s very use-case specific).
Where is the setting for triggers in the AirTable?
Where is the setting for triggers in the AirTable?
First, your base must be in a Pro or Enterprise workspace, as I mentioned before. Only bases in those workspaces currently have access to the automations beta feature. If you have it, you’ll see an “Automations” label next to “Blocks” in the upper-right corner.
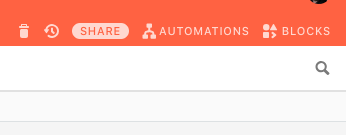
Click on “Automations,” then “+ New automation” to start building a new one.
In this example, my {Status} field has three options, and I want to know when “Option B” is chosen.
I added a formula field that looked for that specific option:
That will output a 1 when there’s a match, and a 0 the rest of the time. I then added a view with a filter to show records when that formula field contains a 1. I named this view “Trigger: Option B” as a reminder that this view triggers an automation.
I added a date field named {Option B Chosen}, where the automation will store the date and time that “Option B” is selected.
I also added a “Last Updated Time” field named {Status Updated}, which will capture any changes to the status.
NOTE: Both {Option B Chosen} and {Status Updated} should be formatted with the time field ON, but not set to GMT. This will ensure that all recorded times remain local. (If you leave the time option off, things won’t work cleanly.)
I added a new automation named “Status Change: B” to trigger when a record enters that view. Make sure that you have at least one record with that option chosen so that the trigger will test successfully.
I then added a “Update a record” action. This will copy the date and time from the {Status Updated} field into the {Option B Chosen} field.
When the status changes to “Option B,” the date will be stored in {Option B Chosen}. For all other options, nothing will happen.
This setup works well when you only want to track a few options out of a larger list, because you’ll need a formula field, a date field, a view, and an automation for each option (you can use the same Last Modified Time field for all of them). When you want to do something unique with lots of options, I’d recommend a slightly different approach (which I won’t get into here in the interest of time, and also because it’s very use-case specific).
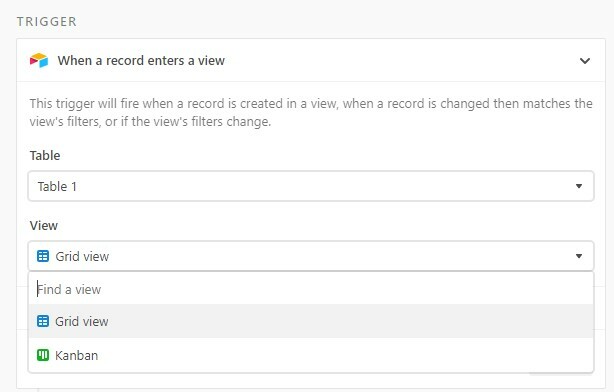
I have no triggers in the “View” field. Table only
I have no triggers in the “View” field. Table only
Those are the views you have currently available on your table. As I mentioned above, I added a view to act as a trigger, and named it to include the word “Trigger” as a reminder to myself.