Automatic Sequential Numbering of Non-Sequential Items (READ JUN 9 2021 FOLLOW-UP)
Summary
This setup allows Airtable to automatically number collections of items that may not be in sequential order. Item length can be either fixed or variable, with only minor changes needed to the core system to accommodate the latter.
Example
To borrow from the thread that inspired this endeavor, say you’re building product codes that have a variant sub-code, and want that sub-code to automatically increment each time an item of a given product code is added in a new record. However, it needs to auto-increment each product’s sub-code separately, even when product codes are added out of order.
For example, the first product code is 001, and its initial sub-code is 1, so the full combined code is 001-1. When you add a new variation of product 001, the sub-code bumps up by 1, creating 001-2.
Now a new product is introduced with code 002. Because it’s the first of its kind, its full combined code is 002-1. If we then introduce a third variant of product 001, it would end up with a combined code of 001-3.
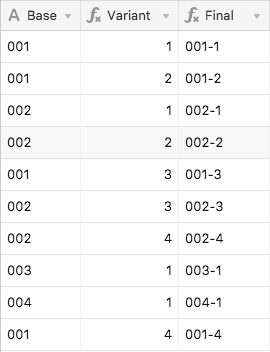
So far our full product codes, in the order they were created, look like this:
001-1


001-2


002-1


001-3
For a small list, creating these manually might not be a problem, but most people don’t use Airtable with small lists. :winking_face: It would be much easier to manage if the variant codes would auto-increment each time we add a new product code.
This independent sequential numbering requires some knowledge of how many of each item came before the current one, no matter how far back in the list those previous items might live. Because each Airtable record is independent, not having any “knowledge” of any other records in the same table, there’s no direct way to reference other records to make this count. However, with a little table and field trickery (inspired by the work of @W_Vann_Hall), this can be done. The core method requires items of a fixed length, but with a minor adjustment it will also work to track items of varying lengths.
Here’s a sample base that you can copy if you wish to dig into the guts of the system, which are described below.
Core Solution
Only two tables are required:
The main table recording the items to be tracked.
A Control] table with a single record.
The data requirements for this setup are:
The primary field in the main table must be an Autonumber field.
Every record in the main table must be linked to the lone record in the rControl] table.
The character length of the data in the field containing the base items to be tracked must be the same for every record. The exact length isn’t important, but it must be consistent. For example, if you’re going to use a five-character base code, the content of that code can be pretty much anything as long as it’s unique (obviously), and always five characters long in every record. The good news is that the field type can be any number of things, including (but not limited to) Single line text, Single select, Date, Duration, Phone Number, or even a link from another table
Here’s a cropped look at the oFixed Length] table in the sample base:
Here’s a rundown of how the system works. All field names are from iFixed Length]:
First, a unique character is added to the base item (see the {Unique Base} field), in order to prevent accidental crossover between base items when a SUBSTITUTE is run later in the process. My sample base uses a vertical bar, but anything else can be used instead as long as it’s not part of any of the base codes.
These unique items are looked up in the Control] table, and that collection is then looked up back in the main table (see the {Lookup} field).
That lookup is then condensed into a string, and only the leftmost portion kept, with the length based on multiplying the record’s autonumber value by the {Unique Base} length (see the {Truncated} field). For example, if {Unique Base} is four characters long, this field will only keep the first four characters of the mashed-together lookup for the first record. For the second record, it will keep the first eight characters, and so on. This creates a record-by-record tally of everything that has been added.
The {Substitute} field then takes that tally and removes all instances of {Unique Base}, leaving everything else except that item.
The length of {Substitute} is subtracted from the length of {Truncated}, then divided by the length of {Unique Base}, and we have the unique number to assign to the listed item (see the {Variant} field)
The variant number is combined with the base and any desired separators in the {Final} field.
The four helper fields in the main table can be hidden once everything is set up. Because the numbers assigned in the Autonumber field are maintained even when reordering records, the variant numbers remain properly assigned even after records are moved around.
Variable Length Items
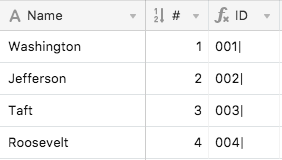
The same basic system also works with items of varying lengths. However, because of that variation, we can’t use the items themselves to track their count. Instead, we need to track another fixed-length item that’s tied to that primary item. For this, I created a new table, with the item names in the primary field, an autonumber field adjacent to that, and a formula field that padded the autonumber with leading zeroes to create a unique fixed-length ID for each item. Because these IDs are only going to be used in various formulas, I also added the vertical bar character here instead of doing so in the main table.
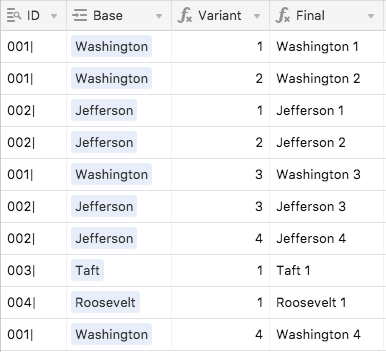
Back in the main table, the base items became links to records in that other table, with a lookup field pulling in each item’s unique ID, and then the rest of the system flows as outlined above, operating on that ID instead of the item itself. Once the item’s unique number is calculated, it’s combined with the original item.
Here’s a sample lookup table for this variable-length system (the oPresidents] table in the sample base):
And here’s the main portion of the >Variable Length] table:
Page 2 / 3
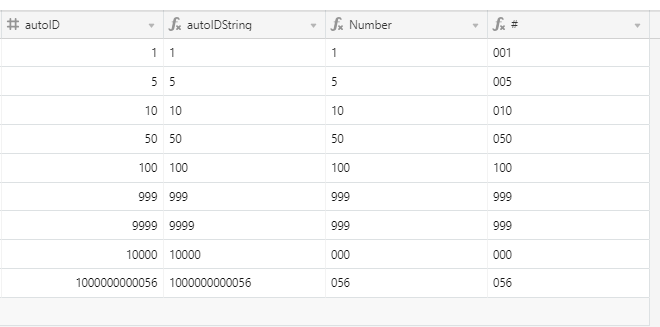
Using RIGHT() wasn’t quite that simple, haha. I had to first convert the nubmer to a string using the Arrayjoin() funciton. Then use a combination of MIN() and LEN(), because RIGHT() doesn’t work if the input string is shorter than the number of characters you are asking for. But I for the result I was looking for
Using RIGHT() wasn’t quite that simple, haha. I had to first convert the nubmer to a string using the Arrayjoin() funciton. Then use a combination of MIN() and LEN(), because RIGHT() doesn’t work if the input string is shorter than the number of characters you are asking for. But I for the result I was looking for
There are a few hiccups in your attempt to add leading zeroes…
The ARRAYJOIN() function is designed to work on arrays, but the {autoID} field returns a number. I get the impression you just want to convert that number to a string, so all you need for that is to concatenate the number with an empty string:
autoID & ""
The rest of the process to add leading zeroes to the number can also be greatly simplified. You only need a single formula. Here’s what I often use when that’s needed.
REPT("0", 3-LEN(autoID & "")) & autoID
Broken down, that takes the autoID value, converts it to a string, subtracts the length of that string from 3 to see how many leading zeroes are needed, repeats the “0” character that many times, and concatenates that with the original number.
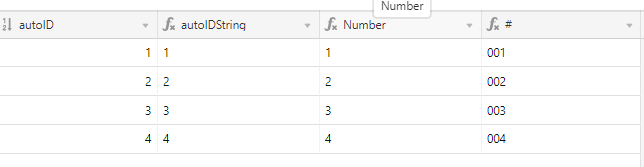
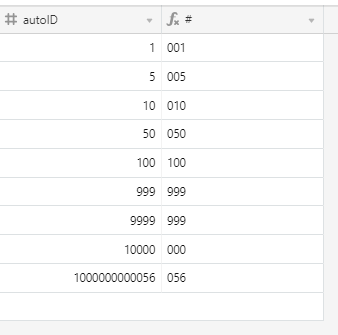
You show great refinement in your work! I never considered using the REPT() function. I did have to make one adjustment. You can’t just feed autoID in, because once the numbers get above 5 digits long the REPT function returns an error. I am guessing this has to do with it’s ability to take negative values. Instead I used the Number field, which already reduces the auto ID to a maximum of 3 digits. Of course, this could be done in a single formula, but I like to break them out at first:
You show great refinement in your work! I never considered using the REPT() function. I did have to make one adjustment. You can’t just feed autoID in, because once the numbers get above 5 digits long the REPT function returns an error. I am guessing this has to do with it’s ability to take negative values. Instead I used the Number field, which already reduces the auto ID to a maximum of 3 digits. Of course, this could be done in a single formula, but I like to break them out at first:
The MOD(autoID, 1000) portion automatically reduces the number—no matter how large—to no more than three digits: the remainder after dividing the number by 1000.
On a side note, you used Number & "" in part of your formula, but the concatenation with the empty string isn’t necessary there. That’s only required to take a non-string value and turn it into a string, but your {Number} field already created a string (the clue: left justification of the output means it’s a string; right-justification, as in the {autoID} field, means it’s a number).
I get where you’re going now, and can offer one more optimized version of your formula.
The MOD(autoID, 1000) portion automatically reduces the number—no matter how large—to no more than three digits: the remainder after dividing the number by 1000.
On a side note, you used Number & "" in part of your formula, but the concatenation with the empty string isn’t necessary there. That’s only required to take a non-string value and turn it into a string, but your {Number} field already created a string (the clue: left justification of the output means it’s a string; right-justification, as in the {autoID} field, means it’s a number).
I’m using this method to make a pallet tracking base, where there is pallet 1 of 2, 2 of 2 etc…
The issue I have is there is almost 12k pallet to track and each one is created via a script from the customer database and I won’t be on the field to do the trick and each pallet must be linked to the controler manually. (I’m fairly new to the airtable world) I tried some sort of wizzardry with zappier to automatically link every new record created, but it doesn’t works.
Is there a way to easilly link every new record created to the controler ?
Welcome to the community, @Thibaut_FERRI! :grinning_face_with_big_eyes: I’m a little less inclined to use this system these days thanks to Airtable’s scripting and automation features, but it’ll still work if you want to use it. In terms of linking every new record to the control record, this can be done using Airtable’s automation system.
The trigger will be the creation of a new record. The action step will be an “Update record” action, where you update that record with the link to the desired control record. You can get the control record’s ID by right-clicking on it and choosing “Copy record URL”. In the automation update step, paste that full URL into the link field you’re updating, then delete everything except the actual record ID (e.g. recXXXXXXXXXXXXXX). Save and activate the automation, and all new records will auto-link to the control record.
Thank you very much, great community ! :grinning_face_with_big_eyes:
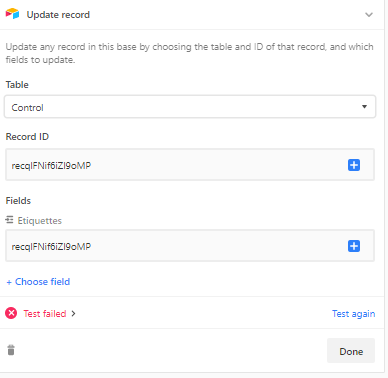
I still have a little issue with this one :
I’d like to update the record in the control table when a record is created in the Etiquettes table. as you said I’ve used the control record’s ID in the record id field, but what to put in the fields “etiquette field” ?
On the etiquette table, the link to control is named “Link2Control”
Cheers guys, thank’s for the support =)
Thank you very much, great community ! :grinning_face_with_big_eyes:
I still have a little issue with this one :
I’d like to update the record in the control table when a record is created in the Etiquettes table. as you said I’ve used the control record’s ID in the record id field, but what to put in the fields “etiquette field” ?
On the etiquette table, the link to control is named “Link2Control”
Cheers guys, thank’s for the support =)
The value in the “Record ID” field of the action should be the record ID from the record that triggered the automation. Delete that current value, then click the + symbol on the right end, and pick the triggering record’s record ID.
Thank you for your time, patience and explanations.
I figured I went the other way around (tried to update the control record instead of the created one).
I’m still struggling a bit with english as it’s not my mothertongue.
I’m really new to Airtable and what you explain here is pretty advance to me. Although, I was able to understand what you explain I’m far to implement it to a specific use case I want.
I would really appreciate if you could give some directions with the following.
How can I modify your base (fixed length option) to have a sequence number that resets for every new year?
For example
2020-001
2020-002
2020-003
…
2021-001
2021-002
It is for an invoice generator I would like to create using Airtable and Google docs templates.
I did dive into this post as well (Sequential Number, Resetting Daily ) but, as I said, my knowledge is far from being able to update these bases with success.
Thank you very much for your help!
Hey @Justin_Barrett. You can omit my previous message. I figured it out but replacing the Base field in the main table with a formula that extracts the year from a “Created date” field and everything works as desired. Thanks again for sharing this post.
It’s been a little more than two years since I wrote the original post that kicked off this thread. While it was fun playing with that solution (and even using variations of it for other things), and gratifying to hear how it has helped other Airtable users, I feel the need to make something clear:
I no longer recommend the method described in this thread
Why not? Simply because there are far better ways of doing this now that weren’t available at the time I developed the original solution. Today I’d recommend an automation that runs a script. Yes, there will be a slight delay while waiting for the automation to run, but it’s still far more flexible and far less error-prone (provided that the script is written well) than my original solution.
One of these days I might put together a sample script that could be used in an automation to do this, but I’m afraid that’s pretty far down my priority list. If anyone else wants to share their scripts here, feel free!
Thank you for the formula-based solution.
I am looking forward to your script-based solution in a near future. Hope you will share your wisdom with us!
It’s been a little more than two years since I wrote the original post that kicked off this thread. While it was fun playing with that solution (and even using variations of it for other things), and gratifying to hear how it has helped other Airtable users, I feel the need to make something clear:
I no longer recommend the method described in this thread
Why not? Simply because there are far better ways of doing this now that weren’t available at the time I developed the original solution. Today I’d recommend an automation that runs a script. Yes, there will be a slight delay while waiting for the automation to run, but it’s still far more flexible and far less error-prone (provided that the script is written well) than my original solution.
One of these days I might put together a sample script that could be used in an automation to do this, but I’m afraid that’s pretty far down my priority list. If anyone else wants to share their scripts here, feel free!
I am looking forward to the script
Soooooooo…I’m starting to work on a script. For the first iteration, it’s going to be one that’s run manually from a Scripting app, but it’ll have configuration options so you can use it in different ways. This might eventually morph into a custom app, but that’s a ways down the road. Baby steps first!
Later on I might mess with converting it into something that will work in an automation, but that will mean more manual tweaks for users to configure it, plus more steps (i.e. possibly more fields) to get the trigger working correctly.
Looking forward to it!
Lots of my use case involve numbering based on different single select, for example
Here’s a video showing how to set it up and how it works:
I’ll start working on an automation version next. Stay tuned!
I don’t know why I didn’t think of this earlier, but it’s possible to automate this without using a script.
I’ll record a video demo next week, but below you’ll find a quick rundown of the steps for now. The test that I ran was with the same single-select field that I used in the demo video above. Because of this, the automation setup was pretty easy, but it will require more careful setup of the automation trigger depending on what type of field needs to drive the automation. I’ll run more tests next week and share what I find. Anyway, here’s what I got to work using a single-select field:
Create an automation that triggers when the single-select field isn’t empty.
The first action is a “Find records” action. Set it to find records based on a condition, with the condition being that the single-select field matches the option chosen by the triggering record. (You’ll need to use the dynamic condition feature to pick this value from the trigger step.)
The next (and final) action is an “Update record” action, where you’ll update the desired field (I stuck with the {Sequence ID} name as in my video above) in the triggering record with the total number of records found from the previous step (under “List properties” for the collection of records, insert the “Length” property).
The first time that an entry is selected, the “Find records” action will only find one record, so a 1 is inserted. The next time that same entry is selected, two records will be found, so a 2 will be inserted, and so on.
The only downside is that records can’t be deleted. At least one person in the discussion above expressed an interest in reusing an old number, but unfortunately that wouldn’t work with this solution. Deleting an old record will throw off the count, and the current highest number for a given item will be repeated when that item appears again. If you need to “remove” a record for some reason, you’ll have to filter it out of the view somehow (a checkbox field named {Archive} maybe?).
A simple script that counts records to find the number of the most recent one would produce the same duplicated-number result if records are deleted because there’s no way of tracking deleted records. However, if you instead “archive” records instead of deleting them—by using a system like I described above—a script could identify such archived records. In that light, perhaps a script version of an automation could have an option to allow the IDs of archived records to be reused. I’ll mull that over for a future project.
Hello Justin , Could you also share this automation step as video , please? I tried to follow the steps that you documented , but it didn’t work. I’m totally newbie to Airtable. Thanks a lot for your sharing.
Hello Justin , Could you also share this automation step as video , please? I tried to follow the steps that you documented , but it didn’t work. I’m totally newbie to Airtable. Thanks a lot for your sharing.
Welcome to the community, @Thet_Paing! :grinning_face_with_big_eyes: Thanks for the reminder. I will post a video about this eventually, but the timing is unknown. Client work is keeping me extremely busy. I do want to post more videos to my YouTube channel—including demos for stuff like this—but I’m seriously struggling to find the time and energy for that. Your patience is appreciated!
Welcome to the community, @Thet_Paing! :grinning_face_with_big_eyes: Thanks for the reminder. I will post a video about this eventually, but the timing is unknown. Client work is keeping me extremely busy. I do want to post more videos to my YouTube channel—including demos for stuff like this—but I’m seriously struggling to find the time and energy for that. Your patience is appreciated!
Hello Justin, first of all thank you for the great solution to solve this via automation.
I´ve two more questions. Does it need a single-select field as trigger? And is there a way to fill in the ID with automations for already existing records?
Hello Justin, first of all thank you for the great solution to solve this via automation.
I´ve two more questions. Does it need a single-select field as trigger? And is there a way to fill in the ID with automations for already existing records?
Welcome to the community, @Timo_Germer! :grinning_face_with_big_eyes:
Any data can be a trigger, but in this case a single-select field works well because the data is fully there when the field changes and triggers the automation. If you’re manually typing and use “When record updated” as your trigger, the automation will trigger on the first few characters because that’s technically an update to the record (it doesn’t wait for you to finish typing). One way around this is to use a form field to add records because forms add the field data all at once, but that might not be ideal in all use cases. There are other ways to work around this, but they start getting messy with extra fields. That’s why I tend to prefer single-select fields as the drivers.
This is doable, but only by running a script as part of the automation, which requires your base to be in a Pro-plan workspace or higher. I’ve got such an automation script on my to-do list, but I honestly don’t know when I’ll get to it.
I´ve one more question: When I set up the automation, I ran into a problem. The action “Find Records” is limited to 100 records. Every record beyond that gets the same result (100).
Since we have significantly more records, I am looking for a solution that is not limited to 100 records. Is there an easy way to set this up?
@Timo_Germer Not without using a script. Scripts have no limit on how many records they can retrieve (aside from memory limits, of course, but that’s not an issue I’ve heard of anyone encountering).